You must add one or more ticket offers to an event in order to sell tickets. Each ticket offer represents a specific price-point, entitlements (what exactly you are offering) and availability (how many tickets to sell) and more. By adding more than one ticket offer, you can create multiple ticketing tires for your events.
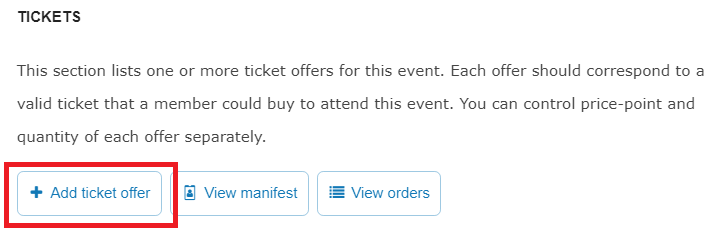
To add an offer to an event, click the Add Ticket Offer button under the Tickets section. Depending on your event format, you may be prompted to select a ticket type.
Select a Ticket Type
Konnectclub supports three types of tickets:

Online Ticket
Select this option to only allow the ticket holder online access. The door scanning app will not accept and validate this ticket. This will be the default and only allowed type for online only events.
Each ticket contains a unique code which can be entered online to gain access to the streaming content of the event.

In-Person Ticket
Select this option to only allow the ticket holder in-person access to the event. Online streaming will not be available with this ticket. This will be the default and only allowed type for in-person only events.
Your door staff can use the scanning app to validate in-person tickets at the door. Online tickets will not be accepted by the scanning app.

Hybrid Ticket
Select this option to allow both online AND in-person access to an event. This will be the default type for hybrid events. Note: you can also list online-only tickets and in-person-only tickets for a hybrid event.
Hybrid tickets would allow the ticket holder the flexibility to attend the live event online OR in-person based on their preference, with an added benefit of re-watching the recording online for 24 hours.
Provide Required Information
- Title: Title should indicate the type of the ticket being offered at this price. Some examples are: “Early-bird discount”, “Students only (ID required)”, “Individual ticket” etc.
- Description: A Short Description of the event, age limits, what the user will have access to with their ticket. Extra helpful information such as a) tickets must be purchased in advance, no group tickets at the door. b) REFUND POLICY: All purchases are final with no refunds unless the event is cancelled.
- Instruction: Required arrival times, important waivers, or additional venue policies. Extra helpful information such as directions or where the user can go to obtain entry into the venue. e.g. Check-in with your event host at the entrance to enter the venue together as a group.
- Offered Price: The price the ticket will be sold at. Note that you are setting price for each ticket unit.
- Regular Price (default – same as the offered price): Price of the ticket without any discount (a.k.a. face value). This can be left blank to indicate that the offered price of the ticket is its face value and no additional discount is being applied.
- Available Qty: The number of tickets that can be sold from now on until the offer expires. Note that this doesn’t indicate the total quantity as any previously sold ticket will not be counted in this.
- Item Tax (default – $0): The tax of the ticket price to be collected from the buyer. You should only set this if you are required to collect AND report sales tax to authorities.
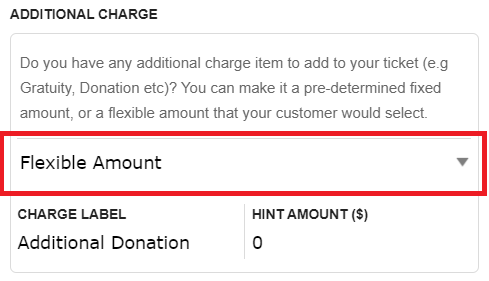
- Additional Charges (default – None): Additional charge items that need to be added to the ticket price (e.g donations, or gratuity 20%). This item will be presented to the customer at the time of the check-out and will be added to the total. Additional charge can be either a fixed amount pre-determined by you or a flexible amount (see below) that your customer will decide during the check-out. In either case, you must provide a label to describe this additional charge which will be displayed to the customer.
- Absorb Platform Fees (default – No): Konnectclub platform fees are normally passed to the ticket buyer during checkout. However, you can absorb the fees (8 – 10%) from your payout and may choose to provide a net-only price for your buyers. Note: we do not generally recommend absorbing fees unless it is absolutely required for your business scenarios.
Enable Flexible Charge
If you would want to receive an additional donation or tip along with your base ticket price, you can turn on the Flexible Amount mode under the Additional Charge setting. You will need to provide a text for the Charge Label which will be displayed to the customer in their payment form. You will also need to set a Hint Amount with a value which will be default selected for the customer when they are checking out.
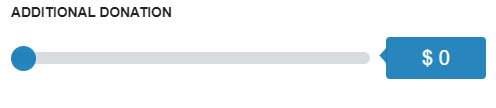
Your customers will be able to move the slider to change this value from anywhere $0 (i.e. no additional charge at all) to a maximum allowed amount. The maximum allowed amount is calculated as the 5 times the hint amount or a minimum of $100.
Enable Advanced Settings
- Optional Add On: This would be an extra service that a user can buy in addition to the regular ticket price. There must be at least one regular ticket offer added before you can add any such Add On offers.
- Walk-in Only: This would be an exclusive ticket option available only to your staff members to accept walk-in or call-in ticket payment. Walk-in Only ticket offers will not be available to general public who are visiting your event page. You can set different pricing and policies for such Walk-in only tickets.
Add Promo/Discount Code
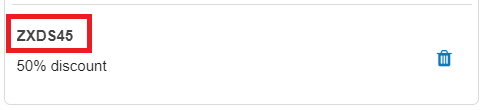
You can create one or more discount code for any of your offers and share it privately with someone who you want to offer additional discounts on top of the listed ticket price. Each discount code has a specified percentage (0 – 100%) which will be applied during the ticket check-out if someone enters the code. You can delete a previously created discount code anytime, which would void any subsequent redemption of that code.
To add a new code, go to your event page under your business account, scroll down to the offer and click the button “Add Promo Code” .

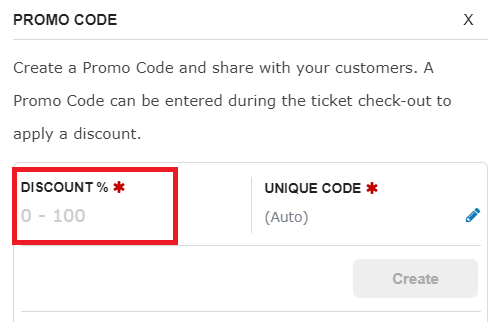
Specify the discount percentage and click “Create”. Once saved, the code will be appear in the list below. Copy the code and share privately.